|
Notes:
- Current is the flow of electrons - A series circuit has only one path for the electron to flow through. - Voltage in a series circuit is divided by the number of electrical components. - The current in a series circuit remains the same because there is only one path for the current the flow through. - Because there is only one path for the electrons to flow through it is impossible to remove one part without stopping the others working. Aim: - To continue from last lessons experiments. Focus Question: What is a series circuit? A series circuit is a circuit in which the flow of electrons has only one path to flow through. A series circuit is the simplest circuit to construct and has lots of advantages and disadvantages. First of all, a series circuit is easy to construct and uses minimal materials. However, if a component in the circuit is broken, destroyed or removed, then the whole circuit will break and not work. Also, due to the electrons having to flow through each individual component, it is impossible to activate and deactivate individual components separately.
Lesson Summary:
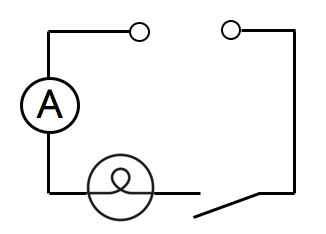
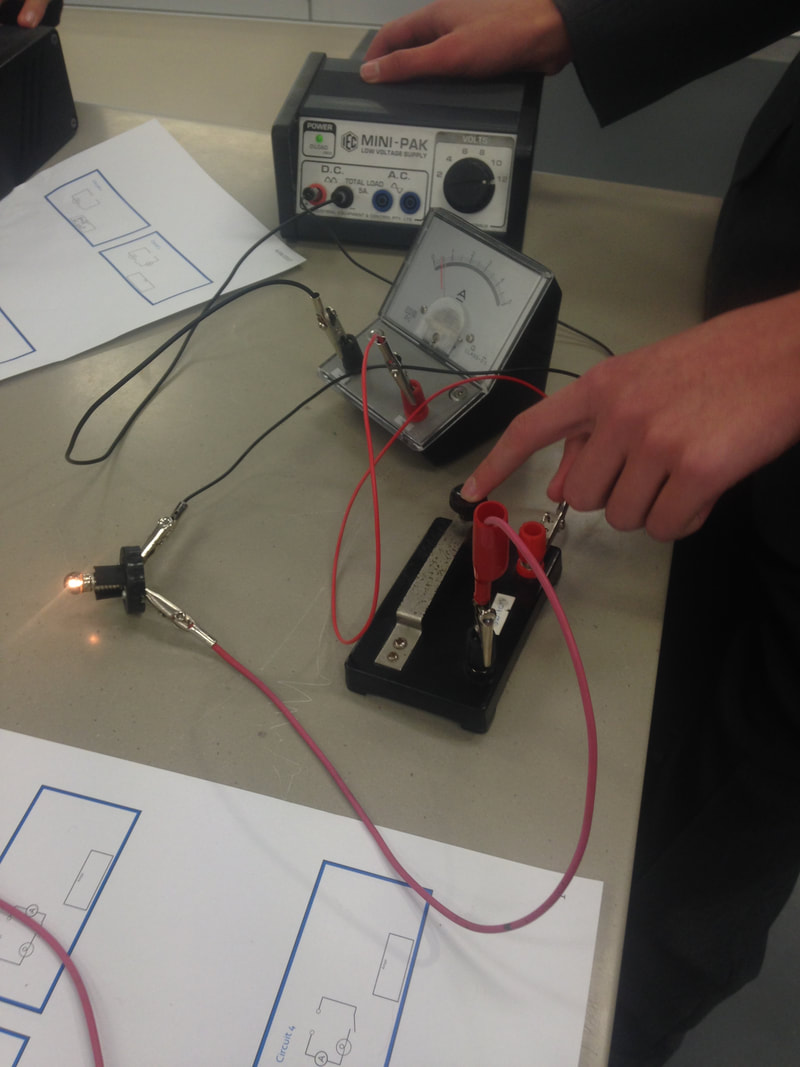
- Constructed circuits - Used ammeters and voltmeters Aim: - To build series and parallel circuits Keywords: Electrons, current, voltage, resistance, circuit Series circuit - stays the same Parallel circuit – splits equally and then re-joins going back to the battery In this lesson we made electrical diagrams into real components to examine how they operated. We used and electrical transformer, wires with alligator clips, an ammeter, a voltmeter and two light bulbs. We created simple series and parallel circuits and examined the effect that the added resistance had on the lights. In a series circuit, as more globes were added, the next consecutive light would become dimmer. This is because the first light was receiving the most energy, while all consecutive lights were receiving less power due to the added resistance of the first lights. However, in a parallel circuit, as more lights were added, no effect was visible. This is because the two separate loops allow energy to flow to each light independently, without the resistance of the previous light. Experiments:
Lesson Summary:
- Constructed circuits - Used ammeters and voltmeters Aim: - To learn common electrical symbols and some definitions. Resistance: The repulsion of a current within a circuit. With more resistance in a circuit, less energy will flow through it. This lesson we learnt how to draw electrical components and how to then draw an electrical diagram. We also went on an interactive website were we could test our knowledge of electrical symbols. (www.physics-chemistry-interactive-flash-animation.com/)  Definitions: - Current: The rate of flow of electrons - Voltage: Potential difference (energy used) - Volts: Units of Voltage - Amps: Units of Amps - Ammeter: Used to measure current - Voltmeter: Used to measure volts Lesson Summary:
- Learnt about electrical symbols - Learnt how to draw a electrical diagram Aim: - To observe static electricity using a Van de Graaff generator. Keywords: Electron, Neutrons, Protons Focus Question: Why do we get electrical shocks? Electric shocks are the transfer of static electrons onto or from the human being. When two objects rub or are pulled away from each other, the materials will either lose or gain electrons, depending on the material. If the electrons are unable to flow to another material, then they will build up and become a large charge of static electricity. Once lots of electrons have built up and you touch them then all of the electrons will flow out at once into you. This is what causes an electric shock. This lesson we were shown a demonstration of a Van der Graaff generator. This video (video 1) explains how a Van der Graaff generator generates its electricity. The belt that can be seen in the video is revolving around two plastic pulleys. The negative charges or electrons are rubbing off of the pulleys onto the belt, causing the pulleys to become positively charged. Due to the fact that opposite charges attract each other, any negative charges on the metal spikes attempt to cross to the pulley, because of its positive charge. However, instead of reaching the pulley, the electrons are collected on the belt, before being brought up to the metal dome at the top of the generator. Once here, the charges have nowhere else to go, so they build up as “static electricity.” In the second demonstration (video 1), a metal pole with strands of nylon on the end was attached to the top of the generator. When the each piece of nylon became negatively charged with electrons, they wanted to get away from each other so the stood on end and separated. The third demonstration (video 1) involved a container filled with styrofoam balls that had been coated in graphite powder (to make them a conductor because styrofoam is an insulator but graphite is a conductor), which was attached to the top of the generator. When the electricity passed into the container, each ball being negatively charged, caused them to repel each other, and bounce around inside the container. In the fourth demonstration (video 3), a stack of foil cups was placed on top of the generator. Once enough electrons had built up, the repulsion caused the cups to fly off the top one at a time in order to get away from each other. The final demonstration, involved a two plastic tubes. One held an exposed wire connected to a LED at the other end, and the other was filled with a gas. When the tube with the exposed wire (end of video 1) was placed within the electric field of the generator, the light would turn on. This is to demonstrate the power of the static electricity. The second demonstration (video 2), with the tube holding gas, was wired by one end to the smaller conducting ball, and the other end to the tap, which is the earthing point. When the charge passed through to the conducting ball, it flowed down a wire, into the tube, activating the gas and causing it to glow. In the video below, you can see a short demonstration on how the Van de Graaff generator works. Lesson Summary:
- We learnt about how a Van de Graaff generator builds up static electrical charge - Observe how electricity can jump across air. Aim: - To understand and describe static, repulsion and attraction Keywords: Static, repulsion, attraction, proton, neutron, electron Focus Question: Why do we get electrical shocks? Electric shocks are caused when we transfer a large amount of either positive or negative energy onto an object with the opposite energy, or vice versa. When two objects rub or a pulled off each other, some of energy comes off, leaving one object with an excess of one type of charge and the other object with the opposite energy. If the energy has nowhere to go via a conductor, then it will build up, creating ‘static.’ This is the energy that is transferred when we get electric shocks. This lesson we learnt about static electricity, repulsion, attraction and their properties. We used the website ‘School for Champions’ to investigate how particles of different charges interact. This diagram shows two objects with differently charged particles. The object on the left is positively charged and the object on the left is negatively charged. We can see that their difference in charge is causing them to pull or ‘attract’ each other. This property is known as attraction. Lesson Summary:
- Learnt about protons, electron and neutrons - Learnt about attraction and repulsions between different types of atoms. |